

How To Create A Compressed Zip File Windows 7
Create a zip file in Windows 7 (Zipped archives / compressed folders)
Since Windows XP, you can create zip files on Windows, without having to own a special kind of software like WinZip or WinRAR; this remains true in Windows Vista and Windows 7. Microsoft took the magic away from creating zip files (compressed folders), and now anyone can do it. This tutorial will go over the creation process, and explain how to add files and even folders to a compressed folder. As a side note, zip files you create in Windows 7 will be compatible with Windows XP and Windows Vista, as well as Mac OS X and Linux (users on those operating systems will be able to open them).
Create a compressed folder in Windows 7
Follow these steps to make a new zip file on your computer:
- First, navigate to the folder in which you want to create your compressed folder: this can be any folder inside Windows Explorer, or your desktop itself.
- Then, right-click on an empty area of the selected folder or your desktop (don't click on a file or folder, otherwise you'll get the "context menu" for this particular item).
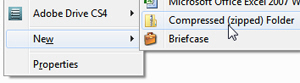
- From the right-click menu, choose "New"; and from that submenu, click on "Compressed (zipped) Folder", as shown on the screenshot below:
- As soon as you do, Windows 7 will add a new zip file, and let you choose a name for it; if you hit Enter, it will call it a default name, something like "New Compressed (zipped) Folder". Make sure that you use a meaningful name that describes the content of the zip file to you or others with whom you'll share it (on the network, by email, etc.)

So, type a name for the compressed folder, and hit Enter to save it. - This is it! Now that you have created your zipped folder, we will show you how to add files to it.
Add files and folders to a zipped / compressed folder in Windows 7
Microsoft has made it very easy to work with zipped folders, and for the most part, you'll find that they generally behave just like regular folders!
- There are two ways to add files to a compressed folder in Windows 7 - since both amount to the same result, just memorize and use the one you prefer (which is easiest may also depend on the situation).
- Method 1: double-click on the compressed / zipped folder to open it; now, you can either drag files from other folders and drop them inside the compressed folder, or you can copy them from other directories on your computer, and then paste them inside the zip file.
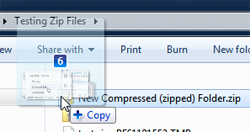
- Method 2: don't open the zip file ↑ just drag the files you want zipped and drop them on top of the compressed folder you just created. Windows 7 will automatically add all these files to the zipped folder, and you are done! Windows 7 will show you a "Copy" tooltip, indicating when you can drop.
- A copy of all the files and folders you dropped in or on top of the compressed / zipped folder is now inside it, and you can email them, create a backup with it, etc.
Tip: the amount of disk space saved by storing files inside compressed folders depends on the type of files you are archiving; "binary files" like movies and pictures are often already compressed, and storing them inside a zipped folder won't make much of a difference. Word documents, web pages, and text files, for example, will compress very well, and the amount of hard drive storage saved will be noticeable. See how you can get file sizes.
Regardless of file size, a compressed folder is a very practical way, for example, to email a group of file as a single file attachment - otherwise you'd have to attach one file at a time!
up ↑
How To Create A Compressed Zip File Windows 7
Source: https://freewindowsvistatutorials.com/createZipFilesInWindows7-ZippedArchivesCompressedFolders.php
Posted by: johnsonwhowerromed56.blogspot.com
0 Response to "How To Create A Compressed Zip File Windows 7"
Post a Comment